For most timber cladding gates, the best combination is Western Red Cedar or a durable seasoned hardwood fixed to a steel or aluminum structural frame with stainless or hot-dip galvanized fasteners and isolation washers. Small gates and side gates are usually a fair weekend DIY retrofit. Heavy driveway gates, automated setups, or anything requiring welded framework should go to a professional. Plan on recoating every few years depending on the finish.
TL;DR:
- Retrofitting timber cladding to an existing metal frame is the most DIY-friendly and cost-effective way to upgrade small gates or side fences.
- Using stainless steel or hot-dip galvanized fasteners, along with isolation washers, prevents rust and corrosion when fixing timber to metal frames.
- Western Red Cedar remains the top choice for rot resistance and stability, though seasoned hardwoods last longer in high-wear outdoor locations.
- Proper framing and hinge sizing are crucial for heavy driveway or automated gates to prevent sagging and ensure smooth operation.
- A full driveway or automation-ready gate should be designed and constructed by professionals with a steel or aluminum frame to maintain longevity and safety.
Table of Contents
- Three Ways to Approach Timber Cladding Gates
- Which Timber Actually Holds Up Outdoors?
- Fixing Cladding to a Frame Without Wrecking the Metal
- Choosing a Profile: Shiplap, Tongue and Groove, or Battens
- How to Retrofit or Build Timber Gate Cladding
- Keeping the Finish Alive Year After Year
- Budgeting for Materials and Hardware
- Where Timber Cladding Projects Go Wrong
- The Gatecon View on Timber-Clad Gates
- Get a Custom Timber-Clad Gate Built to Last
- Sources
- FAQ
Three Ways to Approach Timber Cladding Gates
Most timber-clad gate projects fall into one of three categories, and picking the wrong one wastes money and weekends.
- New timber gate, built from scratch. You control every dimension and profile, but it demands more carpentry skill, a solid understanding of hinge loads, and more time.
- Retrofit timber cladding to an existing metal frame. This is the fastest route to a warmer look on a gate that already works structurally. It's the best fit for privacy upgrades on chain-link or tubular steel gates and small side gates.
- Framed timber-faced gate, where a steel or aluminum skeleton carries the load and timber boards are the visible skin. This suits driveway gates and anything wide, heavy, or automated, since the metal frame resists sag and racking that pure timber struggles with over a 3 to 4 meter span.
Retrofitting is the most DIY-friendly option. Building a whole new timber gate is doable if you're comfortable with a circular saw and a level. Framed timber-faced driveway gates are where most homeowners hand things to a professional, mainly because getting the frame square and hinges rated correctly for a heavy panel is unforgiving work.
Which Timber Actually Holds Up Outdoors?
Not every timber that looks good at the hardware store survives an Australian summer, let alone five of them. Rot resistance, dimensional stability, and weight matter more than grain pattern.
- Western Red Cedar is the standard pick for cladding because it's naturally rot-resistant, light, and stable, meaning it won't warp or split as much as denser species when exposed to swinging humidity.
- Seasoned Australian hardwoods like spotted gum or black butt cost more and weigh more, but they outlast cedar in high-wear, high-sun locations and take stain beautifully.
- Treated pine is the budget option and fine for a low-visibility side gate, but it's usually copper-based, and that chemistry becomes a real problem when it sits directly against a steel frame (more on that below).
- Engineered or laminated boards show up on premium gates because manufacturers can bond them to steel frames with structural adhesives for extra stability, an approach seen on some custom wood-clad gate designs.
Ask your timber yard for "select" or "premium" grade boards for anything facing weather. Lower grades have more knots and reactive grain that will telegraph through paint within a year. Cedar and hardwood cost more upfront, but a $40 improvement on a board that lasts 15 years beats replacing treated pine every 6 to 8.
Fixing Cladding to a Frame Without Wrecking the Metal
The single most common failure in retrofit timber gates isn't the wood. It's rust bleeding through the paint six months after installation.
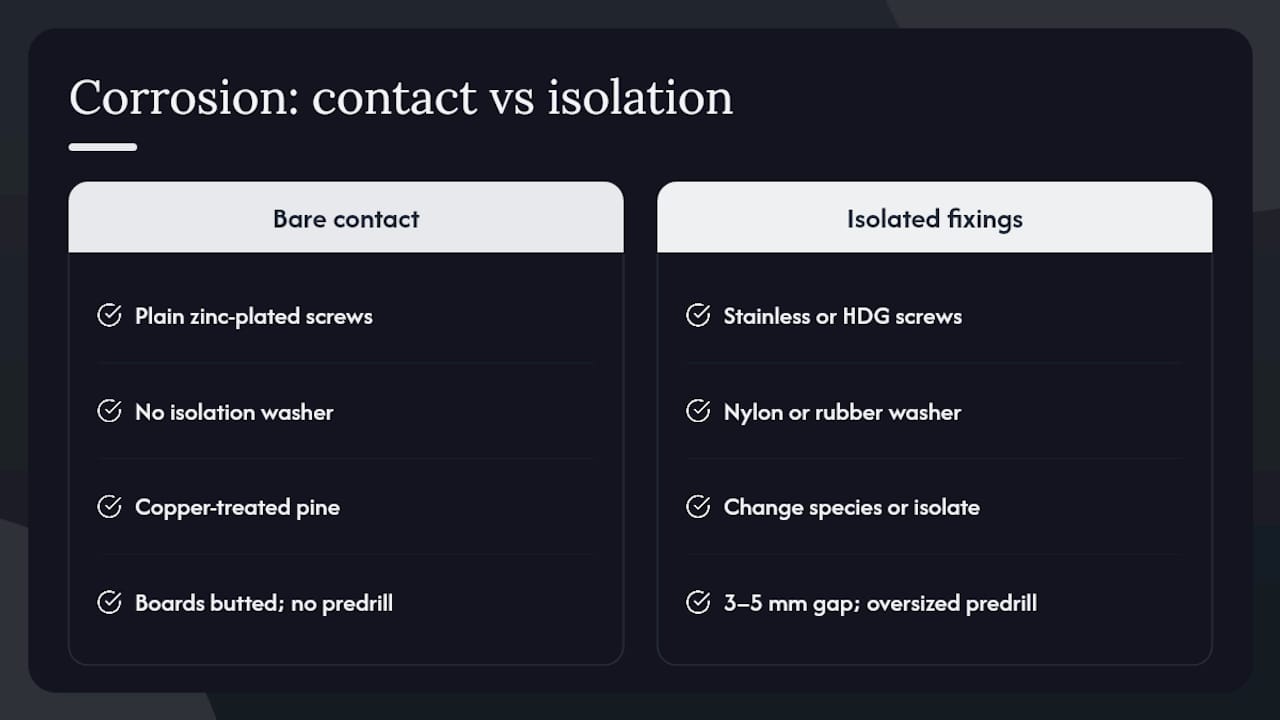
1. Use stainless steel or hot-dip galvanized screws, never plain zinc-plated ones, for any exterior fixing.
2. Fit nylon or rubber isolation washers between copper-treated timber and steel or aluminum framework to break the galvanic circuit.
3. Predrill every hole slightly oversized to prevent splitting and to let the timber expand and contract without cracking around the fastener.
4. Leave a 3 to 5 mm gap between boards for drainage and seasonal movement, and never caulk that gap shut.
Copper-based treated pine is the biggest culprit here. Forum discussions among Australian DIYers repeatedly flag that copper chemicals leach out and accelerate corrosion where the timber touches bare steel, and the fix is either an isolation barrier or switching species entirely, as detailed in one widely referenced Bunnings Workshop thread on timber cladding corrosion. Board thickness of 14 to 19 mm is standard for cladding weight without overloading hinges. Adhesives can supplement screws on a stable frame, but never replace mechanical fixings on a moving gate.
Pro Tip: If a screw head sits below the timber's surface, plug the hole with an exterior wood filler before staining. Bare fastener heads are where water pools first and rot starts.
Choosing a Profile: Shiplap, Tongue and Groove, or Battens
The profile you choose changes how the gate sheds water and how much privacy it delivers, not just how it looks.
- Shiplap boards overlap along a rebated edge, which sheds rain naturally and is a common choice for exterior cladding because it handles weather with minimal gaps, as shown in typical shiplap gate cladding designs.
- Tongue and groove locks boards edge to edge for a flush, seamless look, favored for a cleaner modern finish but slightly less forgiving of timber movement.
- Featheredge boards taper from thick to thin and overlap like weatherboard siding, giving a rustic, textured look.
- Vertical battens spaced evenly over a solid backing panel are the go-to for a contemporary, architectural feel and are easy to retrofit onto an existing frame.
Horizontal orientation drains water fastest and suits a modern aesthetic. Vertical orientation reads more traditional and works well when privacy matters more than a sleek profile.
How to Retrofit or Build Timber Gate Cladding
Before you touch a saw, walk the existing gate and check the frame is square, rust-free, and structurally sound. Cladding a bent frame just wastes good timber.
1. Measure the frame's height and width, then order boards 10 mm oversized on each dimension to allow trimming on-site.
2. Seal or prime all six faces of every board, including end grain, before installation. Finishing after the fact leaves the hidden faces exposed.
3. Starting from the bottom or hinge side, fix the first board plumb with a level, then work across using spacers for consistent gaps.
4. Predrill and fasten with isolation washers where timber meets metal, checking every third board with a level to catch drift early.
5. Once cladding is complete, rehang the gate and test swing clearance at both the hinge and latch side.
Weight adds up fast. A fully clad panel can be noticeably heavier than bare steel mesh, and manufacturers of fully cladded side gates routinely warn that hinges rated for a lightweight frame won't cope with solid timber facing. Upgrade to heavy-duty ball-bearing hinges if you're adding more than a few kilograms per leaf, and if you're planning to automate the gate later, size the frame and hinges for that load now rather than retrofitting twice.
A solid materials checklist and tool list, including saw, drill, level, and clamps, is laid out well in Mitre 10's timber gate building guide, which is worth a read before you buy a single board.
Pro Tip: Dry-fit the entire cladding layout with clamps before driving a single screw. It's the fastest way to catch a warped board or a spacing miscalculation while it still costs you nothing.
Keeping the Finish Alive Year After Year
The finish you choose sets your maintenance calendar more than the timber species does; for detailed guidance on timber shutter finishes and profiles, see the Plantation Shutters Comparison Guide.
- Opaque paint hides grain but needs recoating every 4 to 6 years and shows chips more visibly than stain.
- Semi-transparent stain lets grain show through and typically needs a refresh every 2 to 3 years in full sun exposure.
- Penetrating oils soak into the timber rather than sitting on top, need the most frequent attention (annually in harsh sun), but never peel or crack.
Seal end grain before the first coat goes on, since it absorbs moisture many times faster than the face grain, a point manufacturers consistently emphasize on redwood cladding product guidance. Two to three coats outperform one thick coat every time.
Pro Tip: Check board ends and the bottom rail each spring. That's where water pools first, and catching a soft spot early means sanding and recoating instead of replacing a whole board.
Budgeting for Materials and Hardware
Material costs swing hard depending on species and profile. Treated pine battens sit at the low end, cedar shiplap sits in the middle, and select-grade hardwood or engineered boards bonded to a steel frame sit at the top. Beyond boards, budget for stainless or galvanized fasteners, isolation washers if you're fixing to metal, exterior wood sealer or stain, and heavier hinges if the finished panel gains meaningful weight.
A realistic homeowner budget breaks into three buckets: timber and boards (the biggest line item), fasteners and hardware (small individually but they add up across a full gate), and finish and sealant (often skipped in planning, then bought twice because one coat wasn't enough).
Where the numbers change fastest is automation. A basic retrofit on an existing swing gate is a materials-and-hardware job. Add motorized opening, and you're now paying for a frame rated to carry the extra timber weight plus a motor and control gear, which is where most DIY budgets get blown and where calling in a professional for the frame and automation, while doing the cladding yourself, often makes more financial sense than either extreme.
Where Timber Cladding Projects Go Wrong
The mistakes that show up most often are avoidable, and nearly all of them trace back to skipping a step that felt optional at the time.
Skipping the frame check. Cladding over a rusted or slightly bent frame guarantees the timber will telegraph that flaw within a season.
Mismatched fasteners. Using standard zinc screws outdoors, or copper-treated pine directly against bare steel, is the fastest way to a rust-streaked gate.
No gap between boards. Butting boards tight with zero expansion room causes cupping and cracking once the timber takes on moisture.
Unsealed end grain. This is the single most common reason a "properly finished" gate rots from the bottom up within two years.
Wrong hinge for the weight. A fully clad panel is heavier than it looks on paper, and undersized hinges sag, which then throws off the latch alignment.
Rushing the dry fit. Screwing boards down before checking spacing and level means every mistake gets permanent before you notice it.
If a gate is already showing sag or a sticking latch, check hinge tightness and frame level first. Most "the cladding is warping" complaints are actually a hinge or frame problem wearing a timber disguise. For structural questions beyond a simple retrofit, the Housing Industry Association publishes workmanship guidance worth checking before you commit to a design.
The Gatecon View on Timber-Clad Gates
The mistake we see most is treating cladding as a cosmetic layer instead of a load. A steel or aluminum frame underneath the timber isn't a shortcut. It's what keeps a heavy panel swinging true for a decade instead of sagging by year three. Matching the timber profile to the house's actual architecture, not just what's trending, is what separates a gate that looks intentional from one that looks bolted on.
— Rhys
Get a Custom Timber-Clad Gate Built to Last
If your project has moved past a weekend retrofit into a full driveway gate, a wide double-leaf entry, or anything you want automated, that's the point where a structural frame and proper engineering matter more than a nice stain job. Some companies design and install custom timber-clad gates, building the structural steel or aluminum framework first so the timber face stays straight, swings smoothly, and carries automation hardware without sagging.
Services are often directed to homeowners, builders, and architects who need a gate that matches a specific architectural style rather than something off a rack. That typically covers heavy driveway gates, gates paired with electric operators, and gates where the finish needs to hold up to local weather conditions without annual repainting. Browse examples of completed projects and request a quote for your property to talk through frame design, timber choice, and automation options before you commit to a build.
Sources
- Timber cladding on gate — Bunnings Workshop
- How to build timber gates — Mitre 10
- Housing Industry Association (HIA)
FAQ
What Is the Best Timber for an Outdoor Gate?
Western Red Cedar is the top all-around choice for rot resistance and stability, while seasoned hardwoods like spotted gum last even longer in high-sun, high-wear spots.
How Do I Build a DIY Timber Gate?
Measure and square the frame, seal every board face including end grain, fix cladding with corrosion-resistant fasteners and drainage gaps, then rehang and test the swing before final finishing.
What Is the Cheapest Exterior Cladding Option?
Treated pine battens are typically the lowest-cost cladding, though they need careful fastener choices to avoid corrosion against metal frames and tend to need recoating sooner than cedar or hardwood.
Are Wooden Gates Cheaper Than Metal?
Timber cladding on an existing metal frame is usually cheaper than building an all-new solid timber gate, since you're reusing the structural frame and only paying for boards, fasteners, and finish. For a fully custom bespoke installation, working with a specialist like Gatecon typically costs more upfront than a DIY retrofit but delivers a frame built specifically for the timber's weight and any future automation.